
This is the second article in a two part series of detailed articles focusing on how to mix drums. This article focuses on how to process and mix your multitrack recorded drum tracks. To make this easier to follow we’ve put together a small download pack for you to load into your DAW and try the methods illustrated in this article. It doesn’t matter which DAW you use as the same principals apply regardless of your software.
How to Mix Drums – Multitrack Downloads
Download Multitrack Stems – 6.5 Mb Download Channel Strip Settings – 1.5 Mb
We’re going to show you how we achieved our top notch live drum sound while recording and mixing our best selling Soul Drum Loops sample packs. Listen to the same take before and after mixing. Hear any differences?
Before Mixing
After Mixing
You’d be forgiven for thinking that the ‘Before Mixing’ take has a ‘make it sound like crap‘ plugin applied to it, but you’d be wrong. This take is the clean and raw ‘unprocessed’ mix with no EQ or compression. Amazing what a little bit of tweaking can do isn’t it?
Let us explain how we achieved this huge ‘After Mixing’ sound. To see our exact channel strip settings download the Channel strip image files above.
Step 1 – Set your playback mix levels.
 Assuming that you’ve already spent plenty of time making sure that the recording levels were nice and loud but also as clean as possible, we’ll proceed as if you’ve laid down 8 tracks of audio using a multitrack audio interface.
Download, unzip and then import the WAVE files included in our download example. You can load these into your DAW in whatever order you like but it makes sense to group them together neatly. We tend to record and mix live drums in this configuration if we only have two toms:
- Track 1 – Kick Drum
- Track 2 – Snare
- Track 3 – Under Snare
- Track 4 – Mid Tom
- Track 5 – Low Tom
- Track 6 – Hi-Hat
- Track 7 – Overhead Left
- Track 8 – Overhead Right
This configuration should suite most uses but is only a suggestion. If you use this setup to import our demo files this should work well in any DAW. In your mixer window, adjust the playback levels for each track so that each part of the kit sits nicely in the mix. When learning how to mix drums you don’t want any one part of the kit to take over the mix.
Step 2 – Set your pan positions
Since stereo panning became an option on mixing consoles back in the stone age, mixing engineers have been playing around with the pan settings for every part of the mix. There are no rules, do whatever you think sounds coolest. George Martin used to pan the drum tracks from The Beatles into one side of the stereo mix. While that was cool back in the early days of stereo, these days it can sound a little feeble, especially when you can use that stereo soundscape to make your drums sound so HUGE.
What we like to do is get as natural a stereo effect as possible. We’ll usually pan the toms hard left to right simply because this sounds really cool when a drummer works his way across the toms during a fill. It’s not original but it still sounds good.
We’ll often pan the hi-hat about 30% to the left and pan the overheads fairly wide and equal. We don’t go full hard left and right but about three quarters of the way there.
We like the kick and snare always to be central as these are the main foundations of your groove. They need to have maximum punch in the mix but remember, there are no rules.
Step 3 – How to Mix Drums Using Noise Gates
In case you don’t already know, noise gates are typically used to filter out sounds that fall below a certain volume level.
Gates can be very useful when processing live drums as they can limit the amount of mic spill from other parts of the kit. For example, tom mics always pick up the snare drum. By adding a fairly aggressive noise gate you can mute the track at all times except for when the drummer hits the tom. At that point, the gate will open and allow the tom track to be heard. It will then close again when the track falls below a certain volume (when the tom is not being hit).
Step 4 – How to Mix Drums Using EQ

You may have heard production snobs say that using EQ on drums should not be necessary. That’s all well and good if you have the best sound recording equipment that money can buy. In the real world, EQ can make the difference between an average sounding mix and an excellent sounding mix.
In addition to this you may sometimes want a drum sound that isn’t entirely ‘natural’. EQ (equalization) can come in really handy. Let’s say you’re recording some death metal drums and you need a really ‘clicky’ kick drum. You’ll find that most of the lower mid range frequencies of your kick drum are useless. By adding some presence in the 3kHz region you’ll bring out the ‘clicky’ attack of the kick drum. This will help the kick to be audible when mixed with distorted guitars. It really depends on what type of drum sound you are trying to achieve.
Want That ‘Natural’ Drum Sound?
For this example we are trying to achieve an authentic Soul drum sound with a big natural tone. We wanted lots of room ambience and not too much EQ on the toms. We want a natural sounding kit that has that large room vibe which gives us a sense of grandeur.
When we started putting this article together our plan was to write down each frequency setting that we used for each part of the kit. After we realized how painfully tedious that process would be we decided it would be easier and more useful for you if we simply provided screen grabs of our channel strip settings. This gives you a clear, visual display of what we did to each track. We work in Ableton but the settings used for EQ, gate and compression should be pretty universal.
Click here to download the channel strip settings that we used for this drum mix.
Step 5 – Compression
We’ll often use EQ first and then apply compression as this seems to be the more widely accepted practice however, in reality we’ve found that we can get really good results regardless of which order we use these two vital tools. The most important thing when using compression is not to overdo it (unless that’s the sound you’re after).
The best advice we can offer when applying compression or EQ is to constantly A/B your track. By that we mean always compare the raw ‘unprocessed’ track to the ‘processed’ track by periodically switching off your processing. If it sounds better raw, you’ve clearly overcooked your processing.
Step 6 – A/B comping while in ‘The Mix’
Much like A/B comping of a processed channel you should also do the same thing when your track is in the mix. Switch the channel processing on and off while listening to the entire drum mix as well as when in solo mode. This gives you a clear idea of how well your processing works in terms of the overall kit.
For example, in the channel strip images we provided with this article, you’ll see that the hi-hat track has a massive bass boost in the 264 kHz region. This is normally the exact opposite of what we would do to a hat track. Usually we would filter out as much bass as possible on the hi-hat track but the type of sound we’re after for this session called for a loose and live kit sound and we didn’t want to ‘close mic‘ the hi-hat.
When micing the hi-hat for this session, we placed the mic about a foot away from the hat which of course results in a lot of bleed from the rest of the kit. By boosting the bass frequencies we found that the hi-hat mic picked up a really good overall kit sound which rivaled the overhead mics. This is great but now you’ve got to keep an eye on your panning, pan that hat too far left and the snare bleed will make the snare too wide and less centre focused.
How to Mix Drums – Our Secret Weapon
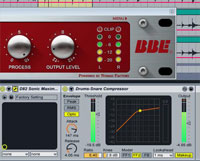 We really can’t believe we’re telling you this. We might just put ourselves out of business here but our secret weapon when it comes to mixing anything (especially drums), is the D82 Sonic Maximizer plugin by Nomad Factory. A word of warning however, with great power comes great responsibility. Use it sparingly and keep and eye on the red line.
When learning how to mix drums add this baby to snare drums and they will POP like you wouldn’t believe.
There are a few other plugins out there which do a similar thing but this plugin stays very true to the hardware version and gives us instant results as you can hear on the finished ‘After Mixing’ version at the top of this page.
How to Mix Drums – Final Mix Compression
The final step when you’ve fixed your levels, pan, EQ and compression, is to cement the entire drum mix with a nice compressor/limiter on your drum sub mix. Don’t confuse this with mastering. This is simply a mild compression that you’re going to add to your drum sub mix. By that we mean you can route each drum track to a stereo pair of faders in your mixer and then add compression to that stereo sub mix. If you want to get really posh you could add a multi-band compressor to really even out the sound. Try it out with some guitars and bass added to your mix to see if the drums need any further processing.
Summary
There you go, that’s pretty much how we do it hear at Silicon Beats. We really enjoy recording and mixing drums because it’s a very creative process. When you learn how to mix drums, you get out what you put in. If you spend the time getting things right at the source you’ll be amazed at the final results. There’s nothing quite like hearing that polished drum mix thundering out of the studio speakers cranked to all the way to eleven at 3 o’clock in the morning, OOF.
Would you like to download a FREE Ableton Template for Dubstep?
Have you got any drum recording or mixing tips you’d like to share? Please post a comment below.
great tips!
I found this interesting and it is indeed helping people to have a better mix on drums….
I wanted to thank you for this advice for mixing drums. I didn’t know that you should try to switch the channel processing on and off to give you a better idea how the processing works. This also seems like a good way to try to identify how you can make this sound clearer and more natural.